There’s a special joy in crafting your own DIY jewelry holder that turns everyday organization into a beautiful expression of your personal style. Whether repurposing old frames, wooden shelves, or simple household items, these handmade solutions keep necklaces tangle-free, earrings visible, and bracelets neatly displayed while adding charm to your space. In this guide, you’ll discover inspiring DIY jewelry holder ideas featuring wall-mounted frames overflowing with sparkling pieces, rustic wooden racks, painted trays, repurposed tennis rackets, and creative stands that celebrate creativity and function. From quick weekend projects to more detailed builds, these DIY jewelry holder concepts will help you design a custom storage solution that feels uniquely yours and keeps your favorite treasures beautifully organized and easy to reach.
Creative Sparks and Handmade Charm Foundations
Let your DIY jewelry holder reflect the joy of making something with your own hands while keeping your collection beautifully displayed. These foundational tips will help you design holders that are both practical and full of personality.
- Repurpose Everyday Frames
You’ll love how old picture frames transformed into DIY jewelry holders create instant wall art while keeping necklaces neatly hanging and tangle-free. - Use Natural Wood for Warmth
Rustic wooden shelves or branches in your DIY jewelry holder bring organic texture and a cozy, handmade feel that complements any décor. - Incorporate Painted Accents
A fresh coat of white, green, pink, or black paint on your DIY jewelry holder instantly updates the look and ties it to your room’s color story. - Add Multiple Levels and Hooks
Layered displays with hooks, knobs, or branches in your DIY jewelry holder allow you to organize necklaces, earrings, and bracelets at different heights. - Make Use of Trays and Bowls
Shallow trays or baskets in your DIY jewelry holder keep rings and small pieces visible and accessible while adding charming tabletop appeal. - Experiment with Unexpected Items
Tennis rackets, chessboards, or old mirrors turned into DIY jewelry holders create unique conversation pieces that showcase your creativity. - Include a Mirror Backdrop
Placing your DIY jewelry holder in front of or with a mirror lets you try on pieces easily while making the display feel larger and brighter. - Keep It Visible and Reachable
Position your DIY jewelry holder at eye level or on a dresser so choosing daily jewelry becomes a delightful ritual rather than a search. - Combine Function with Décor
Let your DIY jewelry holder double as wall art or a styled vignette that enhances the beauty of your space while solving storage needs.
Steps to Build Your Own DIY Jewelry Holder
Turn simple materials into a functional and beautiful storage solution with these easy-to-follow steps that celebrate creativity and practicality. Follow this process to craft a DIY jewelry holder that perfectly fits your style and space.
- Gather Inspiration and Materials
Collect frames, wood, paint, hooks, branches, or household items that speak to you for your DIY jewelry holder project. - Plan the Design and Layout
Decide whether your DIY jewelry holder will be wall-mounted, tabletop, or freestanding, and sketch how necklaces, earrings, and bracelets will be displayed. - Prepare Your Base Structure
Clean and sand frames or wood, then paint or stain to create the perfect foundation for your DIY jewelry holder. - Add Hanging and Storage Elements
Install hooks, knobs, branches, or mesh for necklaces and earrings, and create small trays or compartments for rings and bracelets in your DIY jewelry holder. - Secure Everything Firmly
Use strong adhesive, screws, or wire to ensure your DIY jewelry holder can safely hold the weight of your collection without sagging. - Incorporate Personal Touches
Add decorative elements like dried flowers, seashells, or painted details that make your DIY jewelry holder feel uniquely yours. - Test and Adjust the Display
Hang your jewelry and step back to see how it looks—rearrange hooks or add more levels until your DIY jewelry holder feels perfectly balanced. - Mount or Style the Finished Piece
Hang your wall-mounted DIY jewelry holder securely or style a tabletop version with a mirror backdrop for maximum beauty and function. - Enjoy Your Handmade Creation
Admire how your DIY jewelry holder not only organizes your collection but also adds charm and personality to your everyday space.
Building your own DIY jewelry holder is about more than storage—it’s a chance to express creativity while solving a practical need in a way that feels personal and beautiful. With simple materials, a bit of imagination, and these easy steps, you can create a custom DIY jewelry holder that makes getting ready each day a little more joyful.
1. Wall-Mounted Frame DIY Jewelry Holder with Multiple Necklaces
Transform ordinary picture frames into this charming DIY jewelry holder where rows of necklaces hang gracefully like art on the wall. You’ll love how the simple repurposing creates both practical storage and beautiful wall décor in one creative project.
This DIY jewelry holder turns everyday frames into a stylish display that keeps your collection visible and tangle-free.
2. Chessboard Wall-Mounted DIY Jewelry Holder
Repurpose a chessboard into this clever DIY jewelry holder where hooks or knobs turn each square into a perfect spot for necklaces and earrings. You’ll love how the unexpected base adds playful character while keeping everything neatly organized.
This DIY jewelry holder proves that creative repurposing can result in both functional storage and a unique conversation piece.
3. Rustic Wooden Shelf DIY Jewelry Holder with Hanging Pieces
Build or repurpose a simple wooden shelf into this warm DIY jewelry holder where necklaces and bracelets drape elegantly from the edges. You’ll love how the natural wood brings cozy texture and makes your jewelry feel like part of the décor.
This DIY jewelry holder combines rustic charm with practical hanging space for a beautifully functional solution.
4. Rustic Wood DIY Jewelry Holder in a Bathroom Setting
Create this charming rustic wood DIY jewelry holder that blends seamlessly into a bathroom or vanity area with its natural texture and simple design. You’ll love how the warm wood keeps your pieces accessible while adding cozy character to the space.
This DIY jewelry holder shows how everyday materials can create elegant and practical storage with a handmade touch.
5. Wall-Mounted Jewelry Rack DIY Holder with Several Necklaces
Construct this straightforward wall-mounted DIY jewelry holder featuring multiple hooks that keep necklaces beautifully displayed and easy to choose from. You’ll love how the clean design keeps everything visible while preventing tangles.
This DIY jewelry holder offers a simple yet highly effective solution for organizing and showcasing your collection.
Latest Articles
- 🌿 Whispering Petals & Moonlit Glows: Room Decor Ideas That Transform Your Bedroom into a Living Meadow

- 🌸 Whimsical Petal Sanctuary: Girly Room Decor That Blooms With Pink, Gold & Fairy Light Magic
- 🕯️ Flicker & Fern: Cozy Room Decor That Wraps You in Blush Light and Gentle Greenery
- 🍽️ Golden Hour Gatherings: Dining Room Decor That Feels Like a Meadow Banquet

- 🌿 Petal & Porch: Porch Landscaping Ideas That Make Your Entrance a Living Story

- 🎁 Woven with Love: Gift Hampers That Unwrap Like a Meadow in Bloom

6. White Display Case DIY Jewelry Holder for Bracelets and Rings
Build or repurpose a white display case into this elegant DIY jewelry holder perfect for showcasing bracelets and rings in an organized and beautiful way. You’ll love how the clean white finish makes every piece pop.
This DIY jewelry holder combines protection with visibility for smaller items in a stylish tabletop format.
7. Classic White Frame DIY Jewelry Holder with Hanging Necklaces
Turn a simple white frame into this versatile DIY jewelry holder where multiple necklaces hang gracefully from the bottom edge. You’ll love how the minimal design blends into any décor while keeping your jewelry neatly displayed.
This DIY jewelry holder is an easy weekend project that delivers both function and subtle elegance.
8. Playful Pink Heart-Shaped DIY Jewelry Holder
Create this sweet pink heart-shaped DIY jewelry holder that adds a touch of whimsy while keeping necklaces organized and visible. You’ll love how the playful shape brings personality and joy to your space.
This DIY jewelry holder is perfect for those who want storage that feels fun and feminine.
9. Wall of Necklaces DIY Jewelry Holder Display
Design this impressive wall-mounted DIY jewelry holder where dozens of necklaces create a beautiful cascading display. You’ll love how turning an entire wall into storage becomes a stunning decorative feature.
This DIY jewelry holder transforms jewelry into wearable art while solving storage needs creatively.
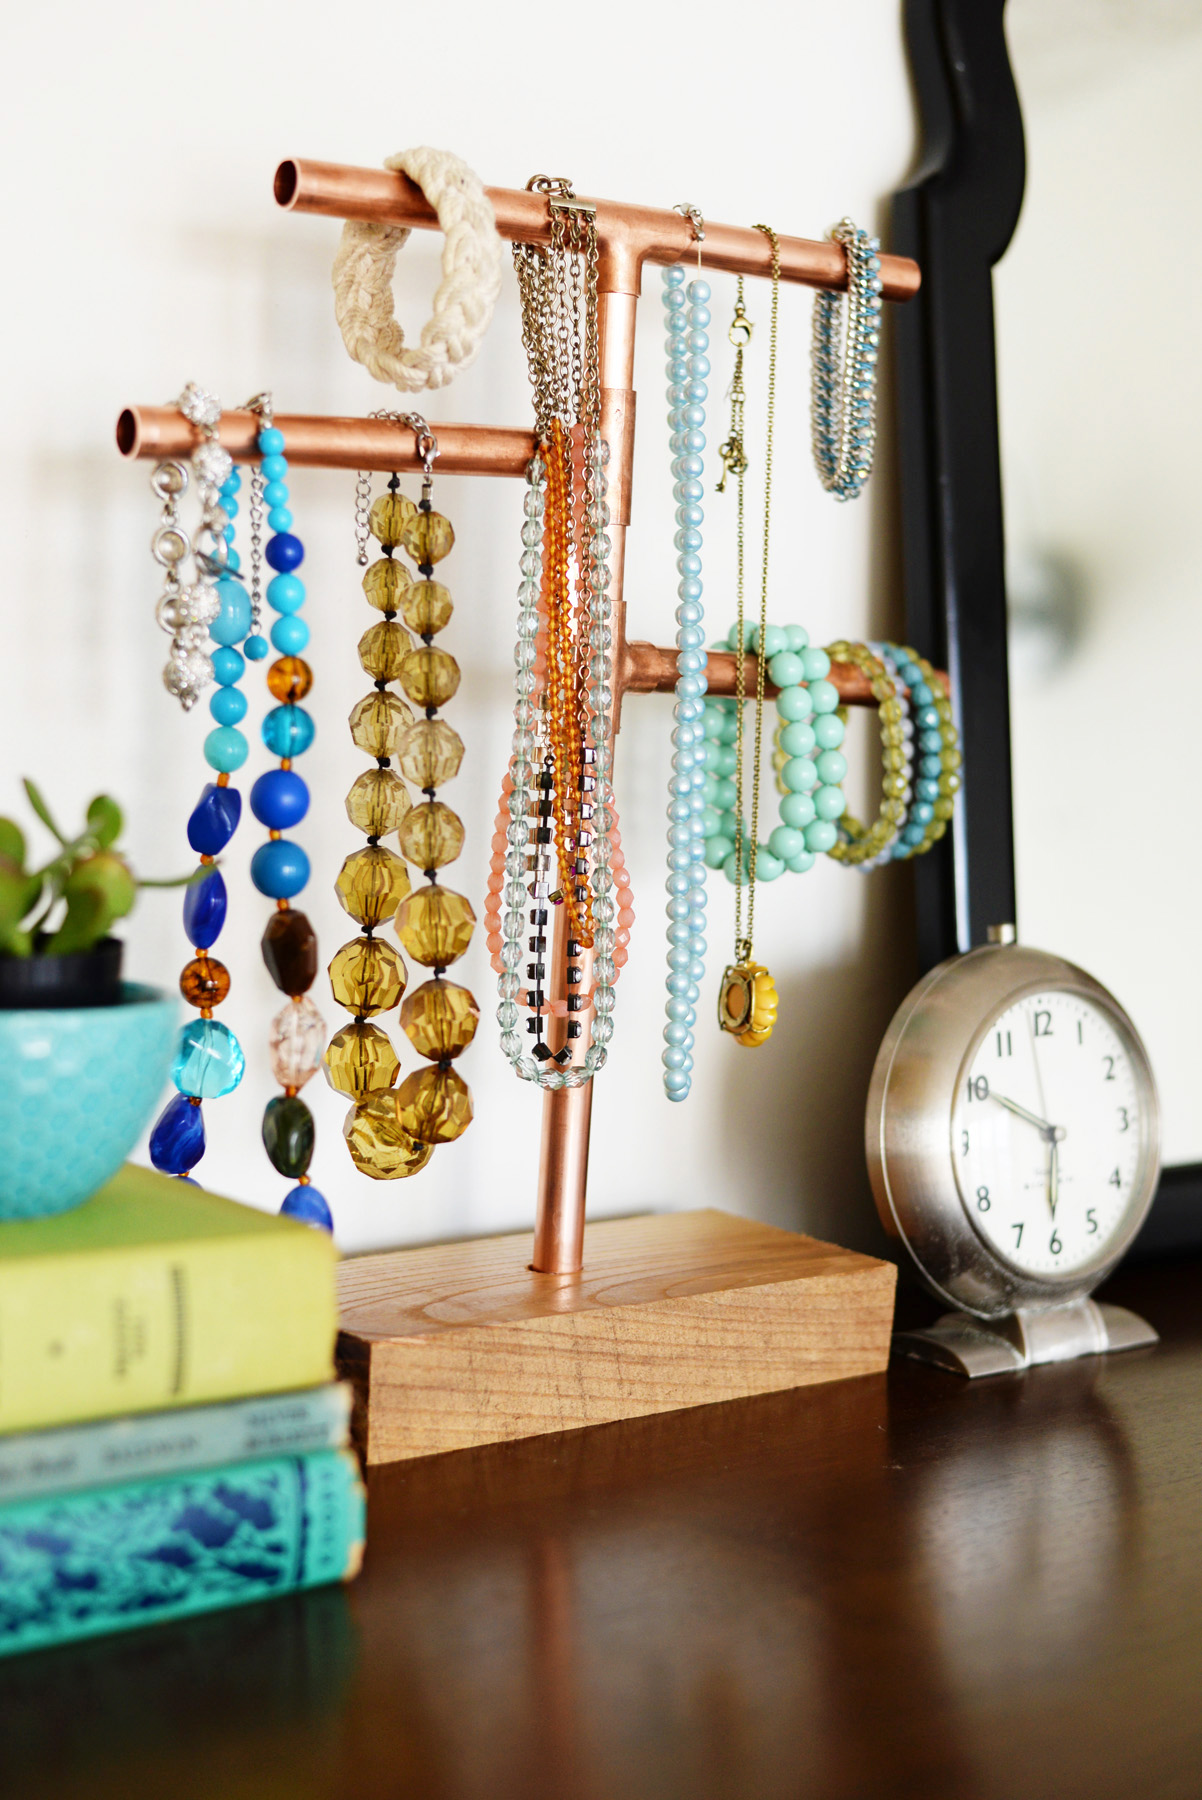
10. Wooden Stand DIY Jewelry Holder with Seashells and Bracelets
Build this charming wooden stand DIY jewelry holder adorned with seashells where bracelets drape naturally from the branches. You’ll love how the coastal-inspired details add personality and beachy charm.
This DIY jewelry holder brings a relaxed, handmade vacation vibe to your everyday jewelry routine.
11. Basket DIY Jewelry Holder Filled with Assorted Pieces
Repurpose a simple basket into this casual DIY jewelry holder that keeps smaller items and necklaces neatly contained yet easily accessible. You’ll love how the woven texture adds rustic warmth to your space.
This DIY jewelry holder offers a quick, no-fuss solution with plenty of boho charm.
Related Articles
12. Pink Tray DIY Jewelry Holder with Flowers and Accessories
Use pretty pink trays to create this stylish tabletop DIY jewelry holder where flowers and jewelry mingle beautifully. You’ll love how the colorful trays turn storage into a decorative vignette.
This DIY jewelry holder is ideal for dressing tables or nightstands where beauty and function meet.
13. Wooden Frame DIY Jewelry Holder Next to Mirror
Craft this elegant wooden frame DIY jewelry holder positioned near a mirror for convenient trying-on and display. You’ll love how the natural wood and reflective surface work together beautifully.
This DIY jewelry holder combines practicality with a polished, finished look.
14. Black Frame Wall-Mounted DIY Jewelry Holder
Create dramatic impact with this black frame DIY jewelry holder that makes necklaces pop against the dark background. You’ll love how the bold contrast turns your collection into striking wall art.
This DIY jewelry holder delivers modern sophistication with minimal effort.
15. Blue Wall DIY Jewelry Holder with Hanging Necklaces
Paint a simple board or frame in soft blue to make this fresh DIY jewelry holder where necklaces hang gracefully against the colored background. You’ll love how the hue adds a calming yet cheerful vibe.
This DIY jewelry holder brings a pop of color while keeping everything neatly organized.
16. Green Framed DIY Jewelry Holder with Varied Pieces
Build this vibrant green framed DIY jewelry holder that displays many different pieces in an organized and eye-catching way. You’ll love how the bold color makes your jewelry collection stand out beautifully.
This DIY jewelry holder turns storage into a lively decorative statement.
17. Tray DIY Jewelry Holder for Rings on Tabletop
Use a shallow tray to create this simple yet effective DIY jewelry holder perfect for keeping rings and small items neatly arranged on a dresser or vanity. You’ll love how easy it is to see and access everything.
This DIY jewelry holder offers quick organization with a decorative touch.
18. Fully Loaded Wall-Mounted DIY Jewelry Holder
Design this impressive wall-mounted DIY jewelry holder filled with lots of necklaces and earrings that creates a stunning visual display. You’ll love how it turns your entire collection into beautiful wall art.
This DIY jewelry holder maximizes both storage and style in one creative project.
19. Wooden Box DIY Jewelry Holder with Hanging Elements
Repurpose a wooden box into this versatile DIY jewelry holder where pieces hang from the edges and sit inside for mixed storage. You’ll love how the rustic box adds character while keeping everything accessible.
This DIY jewelry holder combines hidden and open storage in a charming handmade package.
20. Before-and-After Wooden Jewelry Rack DIY Holder with Sunflowers
See the transformation in this wooden jewelry rack DIY holder decorated with cheerful sunflowers and earrings. You’ll love how a simple before-and-after project results in such a bright and functional piece.
This DIY jewelry holder inspires confidence that anyone can create something beautiful and useful with basic materials.
Frequently Asked Questions
Q: What materials are best for a DIY jewelry holder?
Ans: Old picture frames, wooden boards or branches, painted trays, mesh, hooks, and repurposed items like tennis rackets or chessboards all work wonderfully for a DIY jewelry holder, offering both function and creative charm.
Q: How can I keep necklaces from tangling in my DIY jewelry holder?
Ans: Use individual hooks, knobs, or branches spaced apart on your DIY jewelry holder, and consider adding small loops or clips to each necklace for easy hanging without tangles.
Q: Can I make a DIY jewelry holder for both wall and tabletop use?
Ans: Yes—wall-mounted frames or racks work beautifully on walls, while trays, small wooden stands, or repurposed boxes make excellent tabletop DIY jewelry holders that can be styled with mirrors or plants.
Q: How do I make my DIY jewelry holder look more polished?
Ans: Sand and paint the base, use consistent hooks or knobs, add a fresh coat of color, and style it with a mirror backdrop or small decorative accents to give your DIY jewelry holder a finished, intentional look.
Q: Is it easy to make a DIY jewelry holder as a beginner?
Ans: Absolutely—many DIY jewelry holder projects require only basic tools like a hammer, screws, paint, and hot glue, making them perfect weekend projects even for beginners while delivering beautiful, custom results.
Conclusion
Your DIY jewelry holder has the wonderful ability to become both a practical storage solution and a charming piece of décor that reflects your creativity and personal style. By repurposing frames, wooden shelves, trays, or unexpected items like tennis rackets, and adding thoughtful hooks, paint, and personal touches, you create a custom DIY jewelry holder that keeps your necklaces, earrings, bracelets, and rings beautifully organized and easy to enjoy every day. Start today by choosing just a few materials that inspire you: perhaps an old picture frame and some hooks, a piece of driftwood or painted wood, a shallow tray for rings, or a simple branch for hanging pieces. Gather your supplies, set aside a creative afternoon, and begin building the DIY jewelry holder that makes getting ready each morning a little more delightful. Your perfect handmade jewelry display awaits—let your imagination, a few simple tools, and the joy of making guide you to a space that feels uniquely yours.